I had to do some tweaking to Windows to get this to work so I'll share with you what I did.
#1 Download and install DirectX 9.0c from Windows.
#2 Copy the text below and paste it in notepad in windows. Save the file with the name "SwiftShader", then rename the extension to ".ini". The file should now have the name "SwiftShader.ini". (you could download SwiftShader from the internet, but it's hard to find)
[Caches]
; Vertex cache size
; Keep between 4 and 256
; Recommended: 64
VertexCacheSize=64
; Triangle batch size
; Keep between 1 and 256
; Recommended: 64
TriangleBatchSize=64
; Vertex shader and pipeline code cache size.
; Keep between 1 and 256
; Recommended: 256
PipelineCacheSize=256
; Rasterizer code cache size
; Keep between 1 and 256
; Recommended: 256
RasterizerCacheSize=256
[Quality]
; Maximum texture filter quality
; Linear, Average or Point
; Recommended: Linear
TextureFilterQuality=Linear
; Maximum mipmap filter quality
; Point, Polygon or None
; Recommended: Polygon
MipmapFilterQuality=Polygon
; Mipmap detail bias
; Keep between -8.0 and 8.0
; Recommended: 0.0
MipmapBias=0.0
; Render at half resolution
; Recommended: False
Scale2X=False
; Number of high-quality texture samplers
; Texture stages from 1 to N will sample at high quality
; Texture stages from N+1 to 8 will sample at low quality
; Useful for applications that always keep low-res lightmaps in
; particular texture stages.
; Keep between 0 and 8
; Recommended: 1 for UT2004, 8 otherwise
QualitySamplers=8
; Fast but lower precision perspective correction
; Recommended: True
FastPerspective=True
[Optimizations]
; Reduce overdraw if possible. May not work in many applications.
; Recommended: True for UT2004, False otherwise
OverdrawReduction=False
; Register copy propagation
; Recommended: True
CopyPropagation=True
; Eliminate redundant load operations
; Recommended: True
LoadElimination=True
; Eliminate redundant spill operations
; Recommended: True
SpillElimination=True
; Don't write back unmodified registers
; Recommended: True
DropUnmodified=True
; Write back minimal number of registers at jump
; Recommended: True
MinimalRestore=True
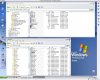
#4 Move the new .ini file into the Tomb Raider folder (or other game folder) as shown in the upper Windows explorer window.
#5 Restart Windows.
#6 Copy the d3d9.dll from C:\WINDOWS\system32 in your VM (this is a WINE .dll file that Parallels has created) and place it in the Tomb Raider folder as shown.
#7 Launch the game and have fun. Watch out for the two wolves at the beginning of the demo

NOTE: You will have to disable shadows, water effects, reflections, etc. if you want any speed out of the game, plus all those effects don't run correctly in the game anyway.
Keep in mind that this is a Graphics intensive program, and probably won't work on a laptop or other desktop Mac except the Mac Pro, you'll just have to try it out for yourself.


 on the screenshots never stop to amaze